|
|
|
|
This article gives hints and tips on how to paint the plastic figures in Hasbro's Battle Cry board game designed by Richard Borg and released by Hasbro in 2000. This strategy game has generated much interesting discussion with respect to board gaming: Is this game a simulation? Is this a miniatures game? Is this a war game? Is this a luck-based game? Regardless of the categorization of the game, I enjoy the game on several levels. Players can play one of many historical-based in about an hour. There is lots of ebb and flow in a game. The simple terrain and battle rules can be learned or taught in about 15 minutes.
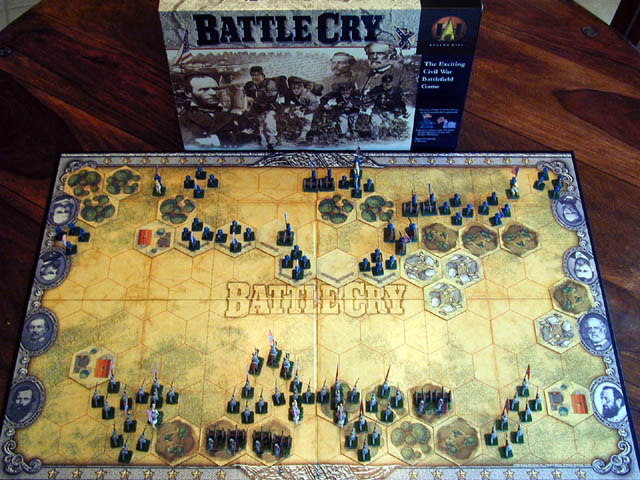
Best of all, each side of the battle has over 50 figures that look great in combat! This multitude of plastic hearkens back to an older time in board gaming. Reminiscent of Broadsides, Skirmish! or other American Heritage series game, the simple rules and 3 dimensional look makes for a great hour of 2 player strategy gaming. Not content to settle with the stock blue and gray plastic, I resolved to paint the armies to add to the enjoyment.

|
|
|
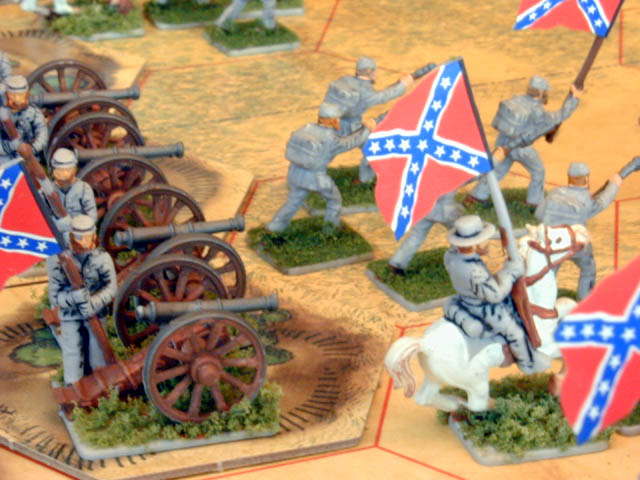
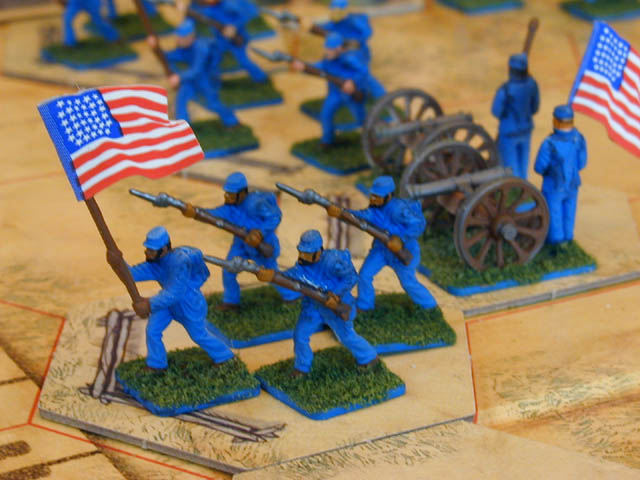
Priming before painting always leads to more durable painting. In the second picture at left we see the Union defenses waiting for Pickett's Charge early in July of 1863 near Gettysburg, PA. Unlike the game setup, I threw in some cavalry to show off these pieces. Unfortunately, an opaque primer would mean redoing the blue and gray base colors so I did the first coat of all the pieces with Citadel Colour Matte Varnish. This give subsequent paint a good grip, and lets the original color show through. I also used the matte varnish as a final coat to protect the painting. Unfortunately, the varnish gives the piece a grayish misting and a somewhat dusty appearance. It is not completely transparent. On normal models I would hate this effect, but for this battle it give the pieces a dusty, war-torn look. It also tones down the electric blue plastic of the Union that is not very historically accurate. I believe the Union had much darker navy blue uniforms.
|
|
|
Cannons, rifle butts and flag poles were also painted dark browns. The cannons and metal rifle parts are painted with Citadel Boltgun Metal which is a metallic silver mixed with black for a sort of cast iron look. The cavalry horses were painted dark browns, and the general's horse were painted white. This actually helps the game play and makes it easy to identify the generals during the game.
|
|
|
As a final painting step, I used Citadel Colour Black Wash to make deep shadows in each figures recesses. Because of the varying coat of varnish, the black ink had a tough-to-control flow rate. On some figures it nicely went into crevasses as intended. On others it simply coated the figure with inky junk. Also, I watered down the ink to lessen the darkness. Unfortunately when it dried, some figures appear to have no inking at all. If someone is an expert in how to control inks and washes, I would love to get more pointers.
As a final step I flocked the bases with a grassy looking sponge rubber material from WoodCraft, available at model railroad hobby shops. I used simple Elmer's Carpenters Wood Glue for its flexibility and dusted the grass sponge on the figures. Although the flock received an overcoat of varnish, it is flaking off rather continually especially along the edge of the base. Never mind. I still like the look of the grass beneath their feet.

|
|
|
To summarize, I sprayed matte varnish as a base coat, assembly-line painted hair and flesh, assembly-line painted rifles and horses, wash the crevasses with black ink type paint, flocked the bases, and sprayed a durable top coat over the whole deal. Despite a bit of flaking and wear and tear, it is a worthwhile investment. My enjoyment of the game is increased 10 fold thanks to the more realistic appearance of the figures. If you have comments, or want to share gaming projects that you have done, I would be happy to hear about your works.
Update (2001/03/17): Two additional artists have sent me their ideas and hints on how to paint Battle Cry figures. Read all three articles on Battle Cry Figure Painting.
Update (2001/08/03): Also, here are a few links to other painted Battle Cry figures on the Internet:
Update (2001/11/18): Read here about my meeting with game designer Richard Borg.